Skip to content
Introduction: Enjoy Summer Coolness Without Fan Noise
Summer heat can be unbearable, making fans an indispensable tool for cooling our homes.
Whether it’s a traditional pedestal fan, a powerful box fan, or a versatile oscillating fan, these devices bring much-needed relief on hot days.
However, the noise generated by these fans can sometimes become a nuisance, disrupting our rest and work.
So, how can you enjoy the cool breeze without the accompanying noise?
Understanding the Source of Fan Noise: Identifying the Culprits
To effectively minimize the noise generated by your fan, it is essential to understand the underlying causes of the unwanted sounds.
Identifying the specific sources of noise allows you to apply targeted solutions, ensuring a quieter and more comfortable environment.
Below, we explore the primary culprits behind fan noise in detail, providing insights into how each issue manifests and can be addressed.
1. Loose Parts
Description: Over extended periods of use, the continuous vibration and movement of a fan can cause screws, bolts, and other components to loosen.
Loose parts are among the most common sources of fan noise, often resulting in rattling, clanking, or humming sounds during operation.
Signs of Loose Parts:
Audible rattling or clunking noises when the fan is turned on.
Visible movement or wobbling of parts that should remain stationary.
A noticeable shift in the fan’s balance or stability.
Diagnosis:
Visual Inspection: Turn off and unplug the fan. Carefully examine all visible parts, including the base, housing, blade guards, and any decorative elements. Look for screws or bolts that appear loose or parts that seem misaligned.
Tactile Check: Gently try to wiggle different parts of the fan to see if they move more than they should. Pay close attention to areas around the motor and blade assembly.
Solutions:
Tightening Fasteners: Use appropriate tools, such as a screwdriver or wrench, to tighten any loose screws or bolts. Ensure that all components are securely fastened.
Reinforcing Connections: For persistent issues, consider applying thread-locking compounds (like Loctite) on screws and bolts to prevent them from loosening over time.
Replacing Worn Parts: If any fasteners are stripped or damaged, replace them with new ones to restore the integrity of the connections.
2. Unbalanced Blades
Description: Fan blades must be evenly weighted and perfectly aligned to rotate smoothly.
When blades are warped, damaged, or unevenly weighted, the fan can wobble, leading to vibrations that generate noise.
Signs of Unbalanced Blades:
Vibrations felt through the fan’s body during operation.
A humming or buzzing noise that intensifies at higher speeds.
Visible wobbling or shaking of the fan when it’s turned on.
Diagnosis:
Blade Inspection: Inspect each blade for signs of warping, bending, or damage. Look for inconsistencies in length, shape, or weight distribution.
Balancing Test: Place the fan on a level surface and observe its balance. If the fan tilts to one side or does not remain steady, the blades are likely unbalanced.
Solutions:
Realigning Blades: Gently bend any warped blades back into their correct position. Ensure that all blades are aligned in the same plane and have a uniform angle.
Balancing Kits: Use a fan balancing kit, which typically includes weights that can be attached to the blades to even out any discrepancies in weight distribution.
Replacing Blades: If blades are severely damaged or cannot be realigned, replace them with new ones to ensure optimal balance and performance.
3. Dirty Blades
Description: Dust, dirt, and grime accumulation on fan blades can disrupt airflow, causing the blades to become unbalanced and the motor to work harder.
This not only reduces the efficiency of the fan but also increases noise levels.
Signs of Dirty Blades:
A noticeable decrease in airflow or cooling efficiency.
A humming or whining noise that wasn’t present before cleaning.
Visible dirt or dust accumulation on the blades and motor housing.
Diagnosis:
Visual Check: Inspect the blades and motor housing for visible signs of dust and dirt buildup.
Performance Test: Notice any changes in the fan’s cooling performance or unusual noises that coincide with a period of heavy dust accumulation.
Solutions:
Regular Cleaning: Clean the blades and motor housing regularly using a damp cloth or sponge. For stubborn dirt, use mild soap and water to gently scrub the surfaces.
Deep Cleaning: Every two weeks, use a vacuum cleaner with a crevice attachment to remove dust from hard-to-reach areas. This helps prevent significant buildup that can disrupt airflow.
Preventive Measures: Place the fan in a less dusty area or use dust covers when the fan is not in use to minimize dust accumulation.
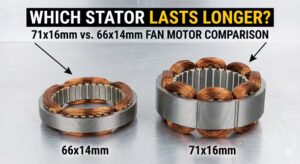
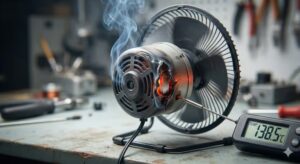
4. Motor Issues
Description: The motor is the heart of the fan, driving the blades to rotate.
Over time, the motor can experience wear and tear, leading to excessive noise.
Issues such as worn bearings, motor misalignment, or internal damage can significantly increase noise levels.
Signs of Motor Issues:
A loud humming, buzzing, or grinding noise emanating from the motor area.
The fan struggling to reach higher speeds or not operating at all.
Excessive heat emanating from the motor housing.
Diagnosis:
Auditory Inspection: Listen closely to the motor area for unusual sounds that differ from the normal operational noise.
Performance Evaluation: Observe if the fan’s performance has declined, such as slower blade rotation or inconsistent speeds.
Physical Inspection: Check the motor housing for signs of overheating, burning smells, or visible damage.
Solutions:
Lubrication: For older fans with oil ports, lubricate the motor and shaft annually using SAE 20 non-detergent oil.
Apply no more than two drops to each oil port to prevent over-lubrication, which can damage the motor.
Tightening Internal Components: If comfortable with disassembling the fan, check for any loose internal fasteners and tighten them.
Ensure that all parts are securely in place.
Replacing the Motor: If the motor is severely worn or damaged, consider replacing it entirely.
This may require professional assistance or purchasing a new fan if replacement parts are unavailable.
Upgrading the Fan: In cases where motor issues are persistent and cannot be effectively repaired, upgrading to a newer, quieter model with a sealed motor may be the best solution.
5. Additional Factors Contributing to Fan Noise
While the primary sources of fan noise are loose parts, unbalanced blades, dirty blades, and motor issues, several other factors can also contribute to excessive noise:
a. Improper Assembly:
Description: Incorrect assembly during initial setup can leave parts misaligned or improperly secured, leading to increased noise.
Solution: Carefully follow the manufacturer’s assembly instructions, ensuring all parts are correctly installed and secured.
b. Surface Placement:
Description: Placing the fan on an uneven or unstable surface can cause vibrations that amplify noise.
Solution: Ensure the fan is placed on a flat, stable surface. Use rubber pads or mats to absorb vibrations and minimize noise transmission.
c. Aging Components:
Description: Over time, components such as bearings, bushings, and belts (if applicable) can degrade, leading to increased noise.
Solution: Regularly inspect these components for signs of wear and replace them as needed to maintain quiet operation.
d. Electrical Interference:
Description: Poor electrical connections or fluctuations in power supply can cause the motor to operate inefficiently, generating additional noise.
Solution: Use a stable power source and ensure all electrical connections within the fan are secure and free from corrosion.
e. Environmental Factors:
Description: External factors such as wind, nearby appliances, or structural resonances in the room can exacerbate fan noise.
Solution: Position the fan away from other noisy appliances and consider soundproofing measures in the room to reduce overall noise levels.
Noise Issues in Different Types of Fans: Tailored Solutions
Different types of fans are designed with unique structures and functionalities, which means their noise issues can vary significantly.
Understanding these differences allows for more effective, targeted solutions to minimize noise.
Below, we explore common noise problems for various fan types and provide tailored solutions for each.
1. Pedestal Fans
Common Noise Issues:
Loose Parts: The adjustable stand and multiple joints can loosen over time, causing rattling or humming noises.
Unbalanced Blades: Directly connected blades can become warped or unevenly weighted, leading to wobbling and increased noise.
Vibration Noise: The height-adjustable mechanism can amplify vibrations, especially on uneven surfaces.
Tailored Solutions:
Secure the Stand: Regularly tighten all screws and bolts in the adjustable joints.
Apply thread-locking compounds to prevent loosening.
Balance the Blades: Inspect each blade for warping or damage.
Use balancing kits to add weights to lighter blades or replace damaged ones.
Stabilize Placement: Ensure the pedestal is on a flat, stable surface. Use anti-vibration pads or rubber mats under the base to absorb vibrations.
2. Box Fans
Common Noise Issues:
Direct Blade-Motor Connection: This can transmit motor vibrations directly to the blades, increasing noise.
Resonance from Housing: The box shape can create resonant frequencies that amplify sound.
Blade Damage: Warped or cracked blades disrupt airflow, causing noise.
Tailored Solutions:
Isolate Motor Vibrations: Use vibration-dampening materials between the motor housing and blades to minimize noise transmission.
Soundproof the Housing: Add acoustic foam or padding inside the housing to absorb resonant sounds.
Maintain Blades: Regularly inspect and replace damaged blades to ensure smooth airflow and reduce noise.
Effective Methods to Reduce Fan Noise: Practical Tips
1. Tighten Loose Parts
Why It Matters:
Loose screws, bolts, and other components can vibrate against each other during fan operation, creating rattling or buzzing noises. Ensuring that all parts are securely fastened eliminates these unwanted sounds.
How to Tighten Loose Parts:
Turn Off and Unplug the Fan: Always ensure the fan is turned off and disconnected from the power source before performing any maintenance to prevent accidents.
Inspect Thoroughly: Examine all visible parts, including the base, housing, blade guards, and decorative elements. Look for screws or bolts that appear loose or components that seem misaligned.
Use Appropriate Tools: Utilize screwdrivers, Allen wrenches, or adjustable wrenches to tighten any loose screws or bolts. Avoid overtightening, which can strip threads or damage parts.
Apply Thread-Locking Compound: For screws and bolts that tend to loosen over time, apply a small amount of thread-locking compound (e.g., Loctite) to prevent them from vibrating loose.
Replace Worn Fasteners: If any screws or bolts are stripped or damaged, replace them with new ones to restore secure connections.
Additional Tips:
Regular Maintenance Schedule: Incorporate tightening loose parts into your regular fan maintenance routine, checking at least once a month during heavy use periods.
Use Locking Nuts: Where applicable, use locking nuts that resist loosening due to vibrations.
2. Balance the Blades
Why It Matters:
Unbalanced blades can cause the fan to wobble, leading to vibrations that generate noise. Properly balanced blades ensure smooth rotation and quiet operation.
How to Balance the Blades:
Turn Off and Unplug the Fan: Ensure the fan is completely powered down for safety.
Inspect Each Blade: Check for uniformity in size, shape, and weight. Look for signs of warping, bending, or damage.
Adjust Blade Positioning: Gently bend any warped blades back into shape or replace damaged blades. Ensure all blades are aligned in the same plane and have a uniform angle.
Use Balancing Kits: These kits typically include small weights that can be attached to the blades to even out weight distribution. Follow the manufacturer’s instructions for application.
Perform a Balance Test: Place the fan on a flat surface and turn it on at a low speed. Observe if there is any noticeable wobbling or noise. Gradually increase the speed to ensure balance across all settings.
Additional Tips:
Use Blade Balancing Tools: Specialized tools can help identify and correct blade imbalances more accurately.
Regular Inspection: Periodically check blade balance, especially after transporting the fan or after heavy use periods.
3. Keep the Fan Clean
Why It Matters:
Dust, dirt, and grime accumulation on fan blades can disrupt airflow, causing the blades to become unbalanced and the motor to work harder. This not only reduces the efficiency of the fan but also increases noise levels.
How to Keep the Fan Clean:
Turn Off and Unplug the Fan: Always ensure the fan is powered down before cleaning.
Remove Fan Guards: Carefully detach any protective grilles or guards to access the blades and motor.
Dust Removal:
Use a Vacuum Cleaner: Equip your vacuum with a crevice attachment to remove dust from hard-to-reach areas, including between the blades and the motor housing.
Wipe Down Surfaces: Use a damp cloth or sponge to gently wipe the blades and motor housing. For stubborn dirt, use mild soap and water to scrub the surfaces.
Dry Thoroughly: Ensure all parts are completely dry before reassembling the fan to prevent moisture-related issues.
Deep Cleaning: Every two weeks, perform a deep clean using a vacuum and damp cloth. Additionally, wipe the blades and motor housing at least twice during the summer months when usage is highest.
Additional Tips:
Use Compressed Air: For intricate parts, a can of compressed air can help dislodge dust without direct contact.
Protective Measures: Consider using dust covers when the fan is not in use to minimize dust accumulation.
4. Adjust the Fan Speed
Why It Matters:
Higher fan speeds generally produce more noise due to increased motor activity and blade movement. Adjusting the speed can help balance cooling efficiency with noise levels.
How to Adjust Fan Speed:
Identify Suitable Speed Settings: Most fans come with multiple speed settings. Determine which speed provides adequate airflow while maintaining a quieter operation.
Use Lower Speeds When Possible: Operating the fan at a lower speed reduces noise and energy consumption. Only increase the speed when necessary for stronger airflow.
Utilize Timer and Oscillation Features: Using timers and oscillation can help distribute air more efficiently, allowing for lower speed settings without sacrificing comfort.
Remote Control or Smart Features: If your fan has remote control or smart features, use them to easily adjust the speed without manual interaction, reducing wear and noise.
Additional Tips:
Optimal Placement: Position the fan where it can circulate air effectively at lower speeds, maximizing cooling efficiency without needing higher speeds.
Sound Level Indicators: Some modern fans come with sound level indicators. Use these to choose the quietest settings that still meet your cooling needs.
Experiment with Angles: Adjusting the tilt or angle of the fan can enhance airflow, allowing you to use lower speeds while maintaining comfort.
5. Check External Components
Why It Matters:
External components like protective grilles, decorative emblems, and housing can contribute to noise if they are loose or improperly secured. Ensuring these parts are stable helps minimize noise.
How to Check External Components:
Inspect Protective Grilles and Shields: Ensure that the fan guards and protective grilles are securely attached to the fan housing. Loose grilles can vibrate against the blades, causing rattling noises.
Secure Decorative Elements: Decorative emblems or caps should be firmly in place. If they are loose, they can create additional noise during operation.
Use Sound-Absorbing Materials:
Cardboard Solution: If the blade guards continue to rattle, wedge a small piece of cardboard between their edges to dampen vibrations.
Silicone Sealant: Apply a drop of silicone sealant to noisy decorative caps to secure them and reduce noise transmission.
Additional Tips:
Replace Damaged Components: If any external parts are cracked, bent, or excessively worn, replace them to maintain the integrity and quiet operation of the fan.
Use Rubber Grommets or Pads: Install rubber grommets or pads on screws and bolts to absorb vibrations and prevent metal-on-metal contact, which can generate noise.
Regular External Inspections: Incorporate external component checks into your regular maintenance routine to catch and address issues early.
Specific Maintenance Tips for Different Fan Types: Customized Care
Proper maintenance is crucial for ensuring that your fan operates smoothly and quietly.
Different types of fans—such as pedestal fans, box fans, oscillating fans, bladeless fans, tower fans, personal/desk fans, and industrial fans—have unique structures and mechanisms, each requiring tailored maintenance approaches.
Below are customized care tips for each fan type to help minimize noise and extend their lifespan.
1. Pedestal Fans
Common Noise Issues:
Loose adjustable stand parts
Unbalanced blades
Vibration from height adjustments
Maintenance Tips:
Secure the Stand: Regularly tighten all screws and bolts in the adjustable joints. Use thread-locking compounds like Loctite to prevent loosening from vibrations.
Balance the Blades: Inspect each blade for warping or damage. Replace any compromised blades and use balancing kits to ensure even weight distribution.
Stabilize Placement: Place the pedestal fan on a flat, stable surface. Use anti-vibration pads or rubber mats under the base to absorb vibrations and reduce noise.
2. Box Fans
Common Noise Issues:
Direct transmission of motor vibrations to blades
Resonance within the housing
Blade damage causing airflow disruption
Maintenance Tips:
Isolate Motor Vibrations: Insert vibration-dampening materials between the motor housing and blades to minimize noise transmission.
Soundproof the Housing: Line the inside of the fan housing with acoustic foam or padding to absorb resonant sounds.
Maintain Blades: Regularly inspect blades for cracks or warping. Replace damaged blades promptly to ensure smooth airflow and reduce noise.
3. Personal/Desk Fans
Common Noise Issues:
High-speed noise from compact motors
Blade imbalance causing buzzing sounds
Motor noise due to limited space
Maintenance Tips:
Use Lower Speed Settings: Operate the fan at lower speeds to reduce noise while maintaining adequate airflow.
Balance the Blades: Regularly check and balance the blades to ensure they rotate smoothly without causing additional noise.
Choose Quiet Models: Invest in personal fans designed with noise-reducing technologies and high-quality components for quieter operation.
4. Industrial Fans
Common Noise Issues:
High-volume operational noise
Mechanical noise from large bearings and motors
Structural resonance amplifying sound
Maintenance Tips:
Implement Soundproofing: Use barriers or acoustic panels around industrial fans to contain and reduce noise pollution.
Regular Maintenance: Conduct frequent inspections and maintenance of mechanical components like bearings and motors to prevent excessive noise from wear and tear.
Upgrade Components: Replace outdated or worn parts with high-quality, noise-reducing alternatives to enhance quiet operation.
Upgrade Options for Quieter Operation: Enhancing Fan Performance
If you’ve implemented basic noise-reduction techniques and still find your fan too loud, upgrading certain components or investing in advanced technologies can significantly enhance its performance and reduce noise. Here are several effective upgrade options to consider for achieving a quieter fan operation:
1. Upgrade to a Quieter Motor
Why It Matters:
The motor is the primary source of fan noise. Upgrading to a motor designed for quiet operation can dramatically reduce overall noise levels.
How to Upgrade:
Choose Brushless DC Motors: These motors are quieter and more efficient than traditional brushed motors. They produce less vibration and operate smoothly, resulting in reduced noise.
Select High-Quality Motors: Invest in motors from reputable manufacturers known for their low-noise designs. Look for specifications that highlight quiet operation.
Benefits:
Lower operational noise
Increased energy efficiency
Enhanced motor longevity
2. Install Noise-Dampening Materials
Why It Matters:
Adding sound-absorbing materials can help minimize the transmission and amplification of noise generated by the fan.
How to Upgrade:
Acoustic Foam Panels: Attach acoustic foam panels around the motor housing or inside the fan’s casing to absorb sound waves and reduce noise.
Vibration Dampers: Use rubber or silicone vibration dampers between the fan base and the surface it sits on to absorb vibrations that contribute to noise.
Benefits:
Significant reduction in noise transmission
Enhanced sound quality
Protection of fan components from vibrations
3. Replace Fan Blades with Silent Designs
Why It Matters:
Fan blades play a crucial role in airflow and noise generation. Upgrading to blades designed for quiet operation can help reduce turbulence and sound.
How to Upgrade:
Aerodynamically Designed Blades: Replace existing blades with those that have a streamlined, aerodynamic shape to minimize air resistance and noise.
Material Upgrade: Opt for blades made from quieter materials, such as high-density plastic or specially treated metals that produce less noise during rotation.
Benefits:
Smoother airflow
Reduced blade-induced noise
Improved cooling efficiency
4. Utilize Advanced Technology
Why It Matters:
Modern fan technologies incorporate features specifically designed to enhance quiet operation without sacrificing performance.
How to Upgrade:
Inverter Technology: Fans with inverter technology adjust motor speed more smoothly, reducing abrupt changes that cause noise.
Smart Controls: Invest in fans with smart controls that optimize speed and oscillation patterns to maintain quiet operation based on environmental conditions.
Benefits:
Adaptive noise reduction
Enhanced user control and convenience
Increased energy savings
5. Invest in High-Quality Fans with Built-In Noise Reduction
Why It Matters:
Sometimes, the most effective upgrade is to replace your existing fan with a newer model engineered for quiet performance.
How to Upgrade:
Research and Select Quiet Models: Look for fans that specifically advertise low noise levels (e.g., models rated below 50 decibels).
Features to Consider: Seek out fans with noise-dampening materials, advanced motor designs, and optimized blade structures.
Benefits:
Guaranteed quieter operation
Enhanced overall performance
Longer lifespan due to superior build quality
6. Add Soundproofing Accessories
Why It Matters:
Additional accessories can further isolate and reduce fan noise, complementing other upgrade efforts.
How to Upgrade:
Soundproof Enclosures: Enclose the fan’s motor and blades in a soundproof casing to contain and absorb noise.
Anti-Vibration Mounts: Install anti-vibration mounts or pads to prevent noise from traveling through surfaces like floors or desks.
Benefits:
Comprehensive noise isolation
Enhanced quietness without altering fan performance
Flexibility in fan placement
FAQ
1. How Often Should I Perform Maintenance on My Fan?
Regular maintenance is key to ensuring your fan operates quietly and efficiently. It is recommended to:
Basic Maintenance: Clean the fan and check for loose parts at least once a month.
Deep Cleaning: Perform a thorough cleaning every two weeks, especially during peak usage seasons like summer.
Comprehensive Inspection: Conduct a full inspection and maintenance check every six months to address any potential issues before they escalate.
2. What Tools Do I Need for Fan Maintenance?
Having the right tools can make maintenance easier and more effective. Essential tools include:
Screwdrivers: Both flathead and Phillips to tighten or loosen screws.
Allen Wrenches: For fans with hex screws.
Adjustable Wrench: Useful for tightening bolts and nuts.
Vacuum Cleaner with Crevice Attachment: For deep cleaning dust from hard-to-reach areas.
Soft Cloths and Sponges: For wiping down blades and motor housings.
Thread-Locking Compound: To prevent screws from loosening due to vibrations.
3. Can I Use Household Items to Reduce Fan Noise?
Yes, several common household items can help reduce fan noise:
Rubber Pads or Mats: Placing these under the fan base can absorb vibrations.
Cardboard: Inserting small pieces between loose parts or blade guards can dampen rattling sounds.
Silicone Sealant: A drop applied to loose decorative caps can secure them and reduce noise.
Compressed Air: Useful for blowing out dust from delicate parts without disassembling the fan.
4. Is It Safe to Disassemble My Fan for Maintenance?
While some basic maintenance tasks can be performed safely, disassembling a fan should be approached with caution:
Basic Tasks: Tightening screws, cleaning blades, and wiping down surfaces can typically be done without fully disassembling the fan.
Advanced Maintenance: For tasks like motor lubrication or internal component replacement, it is advisable to consult the user manual or seek professional assistance to avoid damaging the fan or voiding the warranty.
Safety First: Always ensure the fan is unplugged before attempting any maintenance.
5. How Can I Tell If My Fan Is Defective?
Identifying a defective fan early can prevent further issues and ensure safety:
Unusual Noises: Persistent loud noises that do not subside with basic maintenance may indicate internal problems.
Inconsistent Speeds: If the fan struggles to maintain consistent speeds or frequently stops working, the motor may be failing.
Overheating: Excessive heat from the motor housing can signal electrical issues or motor wear.
Visible Damage: Cracked blades, damaged grilles, or worn-out parts are signs that the fan may need repairs or replacement.
6. What Are the Signs That It’s Time to Replace My Fan?
Even with regular maintenance, some fans reach the end of their useful life:
Frequent Breakdowns: Constant repairs and part replacements can indicate that the fan is no longer reliable.
Inefficient Cooling: If the fan no longer circulates air effectively despite maintenance, it may be time for an upgrade.
Excessive Noise: Persistent noise issues that cannot be resolved through maintenance might mean the fan’s components are beyond repair.
Age of the Fan: Most fans have a lifespan of 5-10 years. If your fan is approaching or has exceeded this range, consider replacing it for better performance and efficiency.
7. Are There Fan Covers or Accessories Designed to Reduce Noise?
Yes, several accessories can help minimize fan noise:
Anti-Vibration Pads: Placed under the fan base to absorb vibrations and reduce noise transmission.
Soundproof Enclosures: Custom-built covers that encase the fan’s motor and blades, designed to contain and dampen noise.
Blade Guards with Sound-Dampening Features: Some blade guards are specifically designed to reduce turbulence and noise while protecting the blades.
Decorative Add-ons: Items like rubber grommets or silicone pads can be added to screws and bolts to prevent metal-on-metal contact, thereby reducing noise.
8. Can Environmental Factors Like Room Layout Affect Fan Noise?
Absolutely, the environment in which your fan operates can influence the noise levels:
Room Acoustics: Rooms with hard surfaces (e.g., tile floors, bare walls) can reflect and amplify fan noise. Adding soft furnishings like curtains, rugs, and cushions can help absorb sound.
Placement Near Reflective Surfaces: Positioning the fan away from walls and large furniture can reduce sound reflection and echo.
Room Size: In smaller rooms, fan noise can be more noticeable. Using a quieter fan model or optimizing placement can help mitigate this.
Ventilation and Airflow: Proper room ventilation ensures that the fan operates efficiently, potentially reducing the need for higher speeds that generate more noise.
9. How Does Fan Speed Affect Air Circulation Efficiency?
Fan speed directly impacts both airflow and noise levels:
Higher Speeds: Provide stronger airflow, cooling larger areas more effectively but generate more noise due to increased motor activity and blade movement.
Lower Speeds: Offer quieter operation with sufficient airflow for smaller spaces or for use during quieter times, such as nighttime.
Optimal Balance: Adjusting the fan speed based on your immediate cooling needs and noise tolerance can help maintain comfort without unnecessary noise.
10. What Are the Benefits of Using Remote-Controlled Fans in Noise Management?
Remote-controlled fans offer several advantages that can contribute to quieter operation:
Convenient Speed Adjustment: Easily change fan speeds without manual interaction, allowing for smooth transitions and reducing wear and noise from frequent adjustments.
Timer Functions: Set the fan to operate only when needed, minimizing unnecessary operation and noise.
Smart Integration: Some remote-controlled fans can integrate with smart home systems, enabling automated adjustments based on environmental conditions, which can optimize both cooling and noise levels.
Reduced Physical Interaction: Less frequent touching and adjusting of the fan can decrease the likelihood of accidentally loosening parts or causing vibrations that generate noise.